Friday 30 November 2012

Celtic Challenge 16

Celtic Challenge 16

This week I updated my Easy Celtic Knots page. I now call it 'How to Design Celtic Knot Patterns'. I still have the link to the youtube video about Freestyle Celtic Knots, because it is such a good video and that is where I got my inspiration, and I want to give credit to the person who got me started down this track.

I have added my own step by step distructions to this page, for those who do not want to stop and start a video on each step in order to try a Celtic Knot Design.

Your challenge this week is to design and decorate your own Easy Celtic Knot Pattern using only one continuous line. Use the instructions on my 'How to Design Celtic Knot Patterns' page to help you.

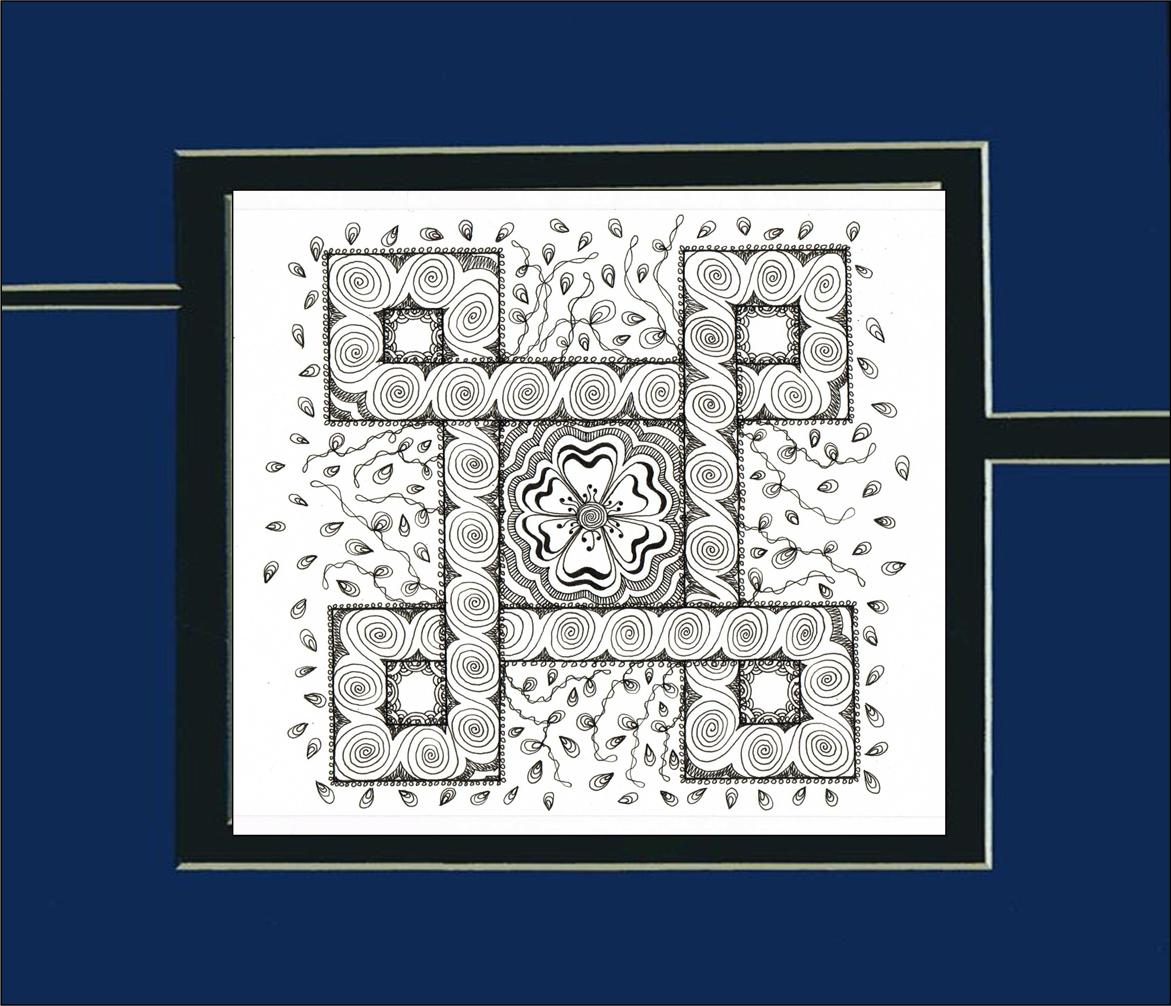
I have done one myself to give you the idea.

STEP 1 - draw one interesting continuous line.


STEP 2 - convert it to a celtic knot pattern


STEP 3 - decorate your pattern

   
I will post the distructions for the two new patterns I have used here tomorrow.

I will be making each challenge a bit more interesting and intricate each week until Christmas, so that by then you should be able to design amazing Celtic Knot Patterns and give me some more ideas. 

Although I have to say that many of you who take up my Challenges are already doing that. Your work and the ideas are wonderful. Thank you.

HAPPY DOODLING


Friday 23 November 2012

Celtic Challenge 15

Celtic Challenge 15

I could not resist a Celtic Christmas Pattern to frame for my wall this year. I stayed with the traditional Red and Green and added Gold and Silver gel pen to give it some sparkle.


Your challenge this week is to make the Celtic Pattern look like Christmas. You can use my Celtic Pattern or use one of your own. I am also encouraging those who have only worked on tiles to try something bigger. The picture above is 5" x 5"/12.7cmx12.7cm.


I used two more new patterns this time "Crest" & "Leaf Links". The distructions for them are below.

CREST

 
LEAF LINK


 HAPPY DOODLING

Thursday 22 November 2012

Aztec Alphabet

Aztec Alphabet
Distructions

Another very easy alphabet to draw.


Draw or trace the outline of your letter in pencil.


Add the contour lines that follow the shape of one side of your letter in pen.


Add the scrolls in pen. Filling in the areas between the contour shapes and the pencil outline.


In pen fill in  the gaps left by the scrolls with shapes that follow the contour of the gap.

After rubbing out any pencil lines that are left, your letter is now ready for you to add, doodle patterns, shading, colouring or whatever other decoration you like.


I added shading, my doodle pattern "Flaming Zig-zag" and some solid fill to the letter above to finish my decorating.


 "Flaming Zig-Zag"
Distructions

 
If you would like to use the whole alphabet in a project I have the complete outline in my book "Creative Doodling with Judy A 2 Z". There are a number of other Alphabets with their corresponding numbers form 0-9 as well as borders, words and frames to match. There a  many new doodle patterns included to use in decorating these Alphabet Outlines.


You can purchase my book: HERE


HAPPY DOODLING


Saturday 17 November 2012

Celtic Challenge 14 Pattern Distructions

Celtic Challenge 14
Pattern Distructions

Here are the patterns I used in my celtic challenge yesterday. I hope they are useful to you.
 
The outer edges I used were:
 
Looped Edge
 
 Zig Zag
 
Outward Scallop

Inward Scallop
 
Under and Over

The new border patterns were:
 
Heartly 
 
Variation to Heartly

Hearts and Contours


Little Hearts Border
 
  Variations to Little Hearts Border

The other items I drew were:

Spider Web
 
Spider
Daisies in the Grass
 
HAPPY DOODLING

Friday 16 November 2012

Celtic Challenge 14

Celtic Challenge 14

I have decided to challenge you to a Celtic Stack this week.

A stack is a group of shapes stacked on top of each other.

A Celtic stack is a group of shapes woven together. 

You can choose to copy my stack outline, or make one of your own.


I decided to turn my stack sideways to make a little scene. You will probably see the glaring mistake I made while weaving my stack, but I left it there anyway.


The doodle patterns I have used are:
The Green Frame -      "Multi" on the inside 
                                    "Looped Edge" on the outside
The Pink Frame  -        "Hearts and Contours" on the inside
                                    "Outward Scallop" on the outside
The Turquoise Frame - "Heartly" on the inside
                                    "Zig-Zag" on the outside 
The Lavander Frame -  "Rollin in" on the inside
                                    " Inward Scallop" on the outside
The Yellow Frame -      "Little Hearts Border" on the inside
                                    "Under & Over" on the outside
I also added grass and flowers to the bottom, 3 flying birds to the top right and spiders and spider webs, to two frames.

I will post the distructions for the new patterns that appear hear tomorrow, for those who would like to try them. 
 
HAPPY DOODLING

Thursday 15 November 2012

Basket Distructions

Basket Distructions


This is a very easy pattern to draw if you are not into perfection. It is a basket weave, and as you know hand weaving and hand made cane is not perfectly even. 

You can do this horizontal or diagonal. 

I have used it in a christmas sock on the toe and curved it to the rounded shape of the sock and reduced the number of woven pieces as I got to the smaller end of the toe. 


Below is the distructions for this doodle pattern.


HAPPY DOODLING

Wednesday 14 November 2012

Detailed Alphabet Distructions

Detailed Alphabet
Distructions


This is a very delicate looking alphabet, that is simple to produce. You can use colour if you wish, and use simple or detailed doodle patterns to decorate. 

Begin by tracing or drawing you letter in pencil.

 I used a stencil to draw the leaves and flowers.
Draw your leaves and flowers over or behind you letter.

 If you are changing the shape draw in pencil first. For example I made the centre of the flower rough, so I drew the centre in pencil and then went over it in pen to get my final finish. 

If you are drawing your shapes exactly as they are on the stencil, then draw in pen.

Be sure to remember whether you are having your leaves and flowers sit on top or behind the letter, and draw the parts of the leaves and flowers that you need to achieve this.
Draw the parts of the letter that is not hidden in pen.
Rub out any pencil lines that are left.
Add any detail in pen that you wish to your letter. I have added a centre line to the leaves and some shading on each petal.
Your letter is now ready to decorate with doodle patterns of your choice. I have used my doodle pattern Wavy Lines on the leaves and some overlapping wavy paralled lines for the background. I call the background pattern Slither'n, but I am sure I have seen it somewhere else done by others, I am just not sure where.

Here are some variations of this design done with the same patterns but each with a slight variation.


Below is my distructions and variations for "Slither'n".

 
If you would like to use whole alphabets in a project I have  complete outlines in my book "Creative Doodling with Judy A 2 Z". There are a number of Alphabets with their corresponding numbers form 0-9 as well as borders, words and frames to match. There a  many new doodle patterns included also to use in decorating these Alphabet Outlines.


If you would like to purchase my book click: HERE
 
 
HAPPY DOODLING

Monday 12 November 2012

Creative Doodling, Airbrushed Bookmark

Cutting up Doodle Designs into Bookmarks


Christmas is almost upon us and there is never enough time to do the little things. Do you have those friends you think about at Christmas and wish you had caught up with more during the year. Time gets away from all of us in our busy lives these days. How about adding a little something to that christmas card. If your friends like reading a Bookmark  comes in very handy. 

I decided this year I would add some bookmarks to the cards of friends who read. 

I cut up some pictures that I had already doodled, into bookmark size. The bookmarks I am showing you in this post is cut from the pictue "Up in the Canopy," that I showed in a previous post.

I have a corner cutter, so I cut rounded corners on each book mark. I think they look nicer that way.
 I sign the back of each bookmark and then Laminate them.
Here are the other 3 bookmaks I got from this one picture.

HAPPY DOODLING