Friday, 8 February 2013

Celtic Challenge 21

Celtic Challenge 21

Hi all, I hope you have had a good couple of weeks. 

I have decided to introduce some new ways to challenge you this week.

Celtic Challenge 21 A.

Copy the outline below onto some interesting paper or card. Not just plain white or cream, but something with a pattern. Hand made papers are very interesting or if you have some decorative papers, that you use for card making, scrapbooking or journalling. Then decorate your celtic pattern taking into consideration the patterned paper you have copied it onto. 

I have left a large open centre this time, giving you plenty of room for an interesting decoration.  

This outline would make a good frame I think.

Celtic Challenge 21 B

Use the distructions below to draw your celtic outline. Once you have finished, scan it onto your computer and print it onto a patterned piece of card or paper as I have instructed above. Then decorate your outline, taking into consideration the patterns on the paper.
Here are your distructions:

A. Draw the whole design in pencil first. Draw 6 intersecting lines, equally spaced apart. Alternating short and long lines.

B. Draw a line curving from the top of the short lines to part the way down the longer line beside and back to the top of the next short line. Continue all the way around to make a continuous curved line.

C. Draw a second line starting from the top of the longer line and curving part the way down the next shorter line and then back to the top of the next longer line. Continue all the way around to form a second continuous line.
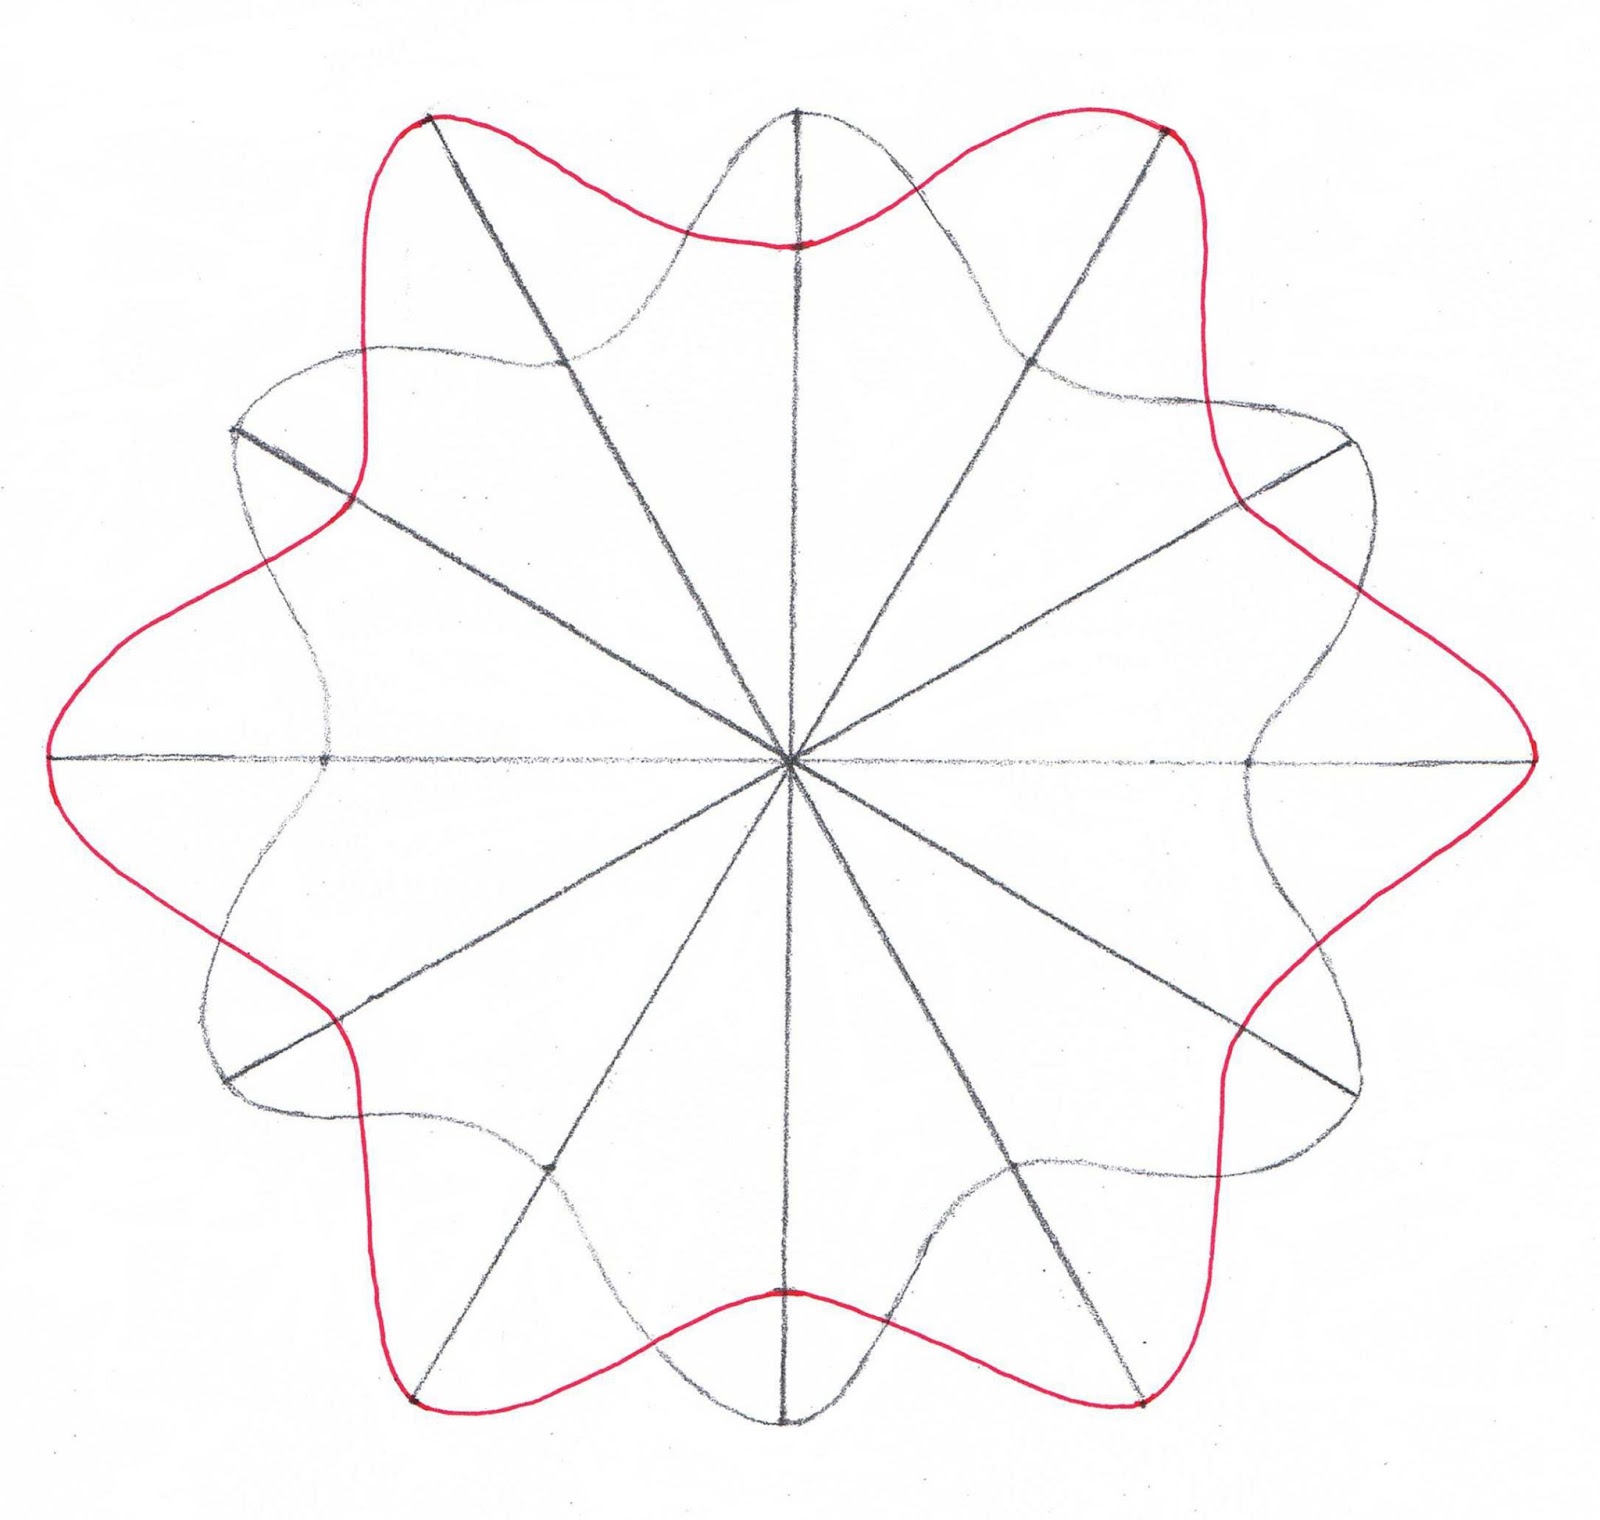
D. Draw a second parallel line just inside the first continuous line.
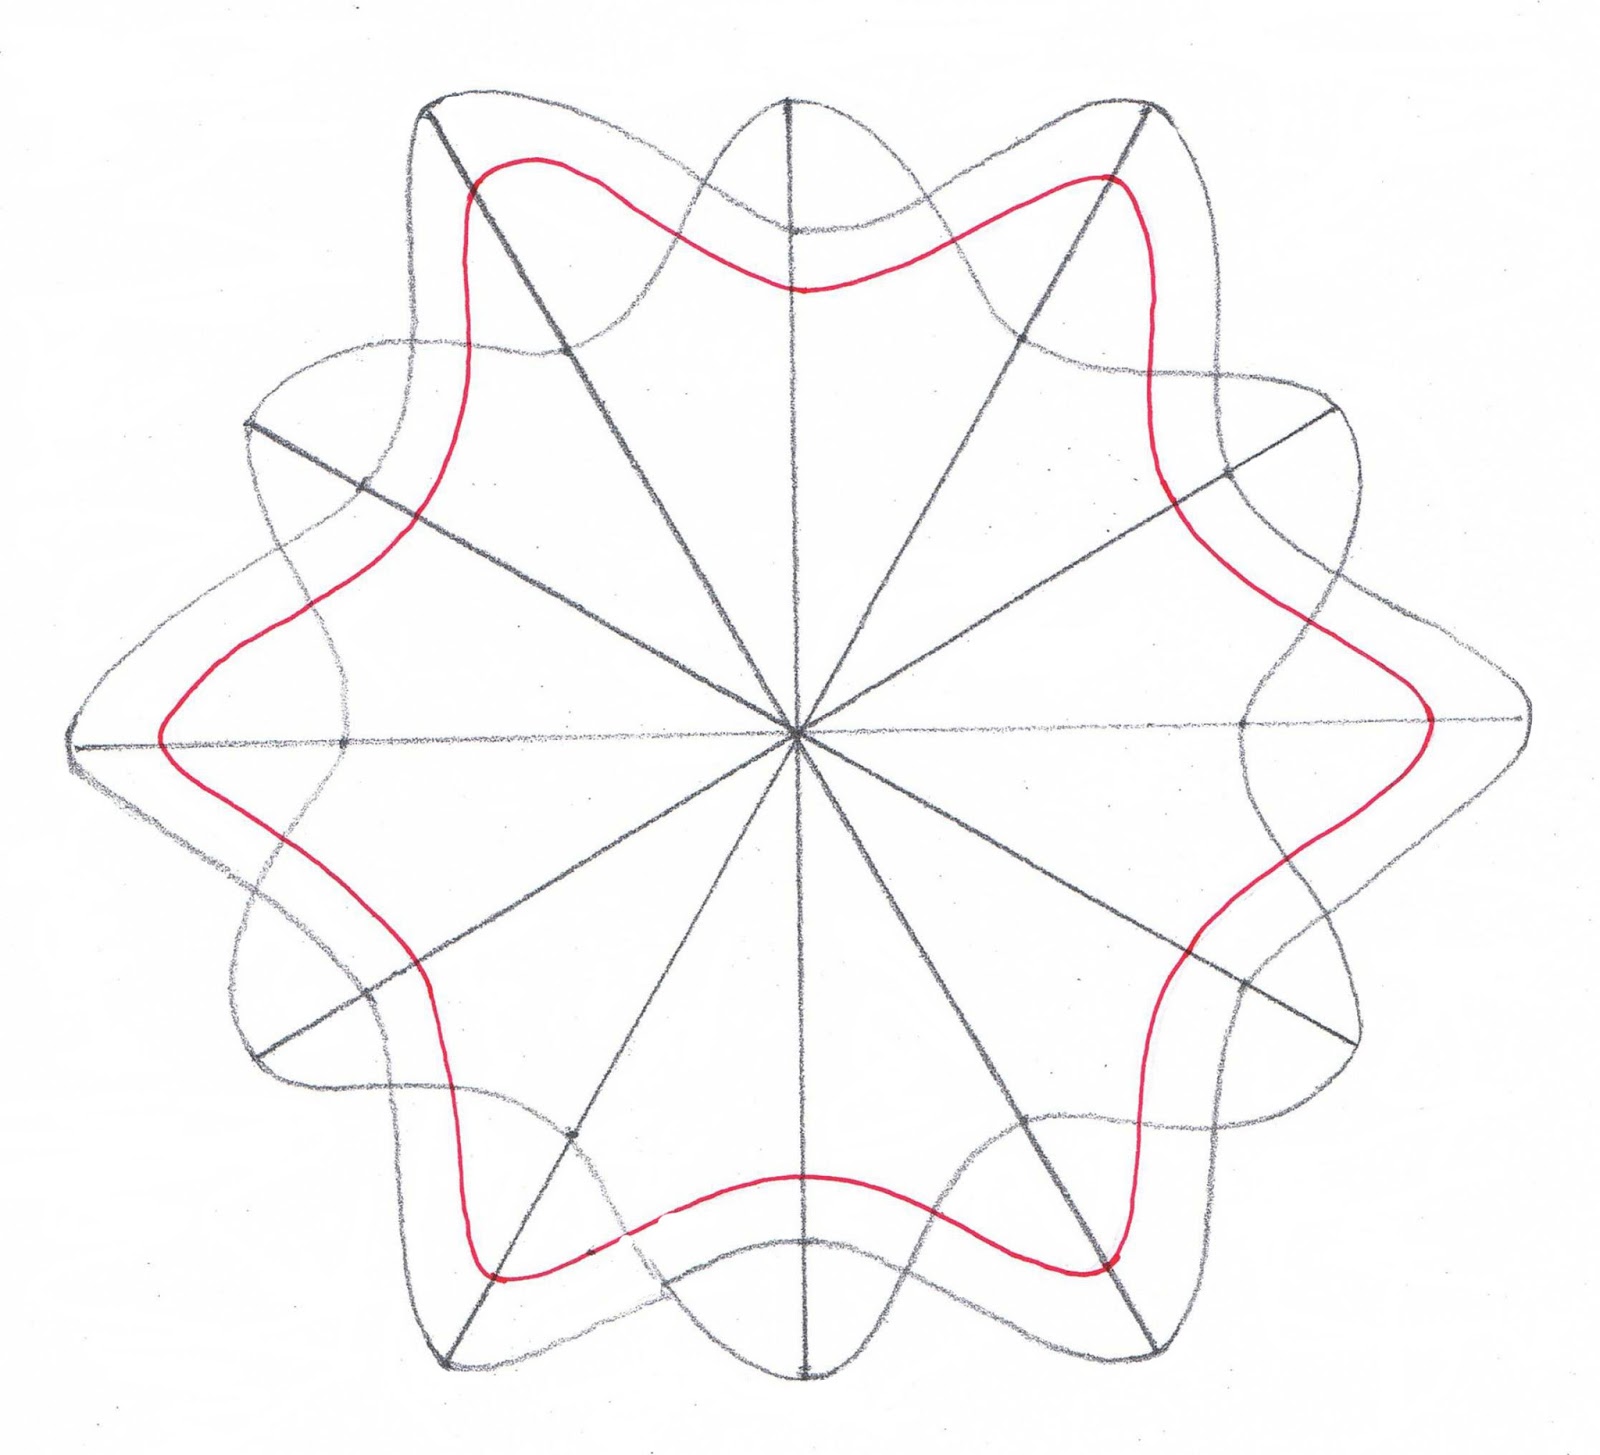

E. Draw a second parallel line just inside the second continuous line drawn.

F. Your celtic frame is complete. Rub out the guide lines and the sections of the continuous lines that would go under. Make sure the weave in a continuous over and under pattern, all the way around. Then to finish, go over the lines that are left in ink.

This is how I decorated this pattern.

 The paper I used had a faint all over shell pattern. I am not completely happy with this one. I may do a second and post it later in the week.

The main patterns I have used are:
                                            Hilly
                                            Paprus - a new design

  You can find the distructions for Hilly on my Border and Edges Pattern Page.
PAPRUS Distructions

        
       HAPPY DOODLING       


Tuesday, 5 February 2013

Dare 43 plus 3 New Patterns

Dare 43

Erin from The Bright Owl Blog has come up with another very nice design for her Zendala Dare.
Below is my finished piece for this challenge.

I used an 02 Micron Pen for the heavier lines and a 005 for the fine lines, on Watercolour paper.

The patterns I used are my own. They are Zing, Undergrowth and Streaming in. The distructions for each of these are pictured below.

ZING


UNDERGROWTH


STREAMING IN


HAPPY DOODLING

Thursday, 24 January 2013

Celtic Challenge 20

Celtic Challenge 20

I will be giving you two options for each challenge this year. You can do one or both of these challenges.
I will only be posting my Challenges once a fortnight as I am my husbands carer and he is requiring more help now, so I have less time.
Challenge A, will be to copy and decorate the Celtic Knot Outline I have provided.
Challenge B, will be to use my distructions to draw your own Celtic Knot Outline and decorate it. 
Celtic Challenge 20A

Copy the Celtic Design below and decorate with doodles. Colour and shade if you wish.  
 Celtic Challenge 20B


Use the distructions below to draw your own Celtic Outline. You can go with the Heart and Oval shapes that I have used or come up with alternatives. Then decorate the design you have drawn however you wish.
 
This design used the same basic distructions as the last Challenge, but I have added some extra lines to the cross, and added a small shape between the large shapes, where as in the last challenge I put a small shape inside large shape.
This whole design is drawn in pencil first.
Draw a cross in pencil. Then add two more intersecting lines between the arms of the cross. Put a pencil mark halfway along each line.
 Add an oval shape beginning at the halfway dot and extending to the end of the line, with equal parts either side of the line. Extend the bottom of the shape toward the middle dot on the next line, leaving a gap for the intersection.

Draw a second line parallel to the first around each oval shape.


Close the gap left by the extended parallel lines.


 The outer weave is now complete.
Draw a small heart in the middle of the gap between each large oval shape, extending a line from that heart to the bottom point of the next heart. The extension line is in the opposite direction to the extension line for the large ovals.
The heart extension goes over the lines at the botton of that heart but stops at the lines beneath the next heart.
 Draw a parallel line around each heart and along the extension.

As you can see by the drawing below you have now completed all the guidelines. 

 
You can now go over the lines in ink. Making sure to rub out the sections you do not require. It is a bit difficult under the heart as there are three lines intersecting. Make sure the two heart lines go one under and one over the ovals extension line. Make sure you do it in the same direction at the bottom of each heart, to ensure a continuous under and over weave.
My inked version is at the top of this post. 
Below is how I decorated my Celtic Challenge. 

Although I like the pattern at the centre of this design, I am not sure I like it or the colour I used in the centre section. But here it is. I used a variation of Betweed in the centre.
I coloured this with distress ink on watercolour paper. I used a micron pen to draw the initial outline and the doodles.
My patterns I used are:
                                       Little Weeds - a variation
                                       Wavy Lines
                                       Ric-Rac - a new pattern
You can see the distructions for my other patterns on the pattern pages I have on this Blog site.

Ric-Rac Distructions

HAPPY DOODLING 


Monday, 21 January 2013

Dare 41, Madison's Square Garden & 3 New Patterns

Dare 41, Madison's Square Garden
& 3 New Patterns

Dare 41

I really enjoyed this one sooo much Erin. Thank you. If you have not tried any of Erin's Dares, click on the button at the side for The Zendala Dare and give it a try.


I used distress ink and a brush to colour this design. I did it on watercolour paper and used a Micron Pen. 

The patterns I used are:
                                                     
                                  Wavy Lines
                                  Centre Decoration
                                  Sunrise
                                  Coral
                                  A new one Little Weeds

Little Weeds Distructions


Madison's Square Gardens

I was in a very flowery mood over the weekend and this was the result.


I used a stencil to draw the overlapping squares. I then redrew them with wavy parallel lines that weave over and under each other. 

To decorate the frames themselves I used the patterns:  
                               Rolling In
                               Multi
                               A variation of Tree Trunk
                               A new one Heartbeat
                                                      
Heartbeat Distructions


To decorate inside the frames I used:
                                                      
                               Half Flower
                               Leaf Sprig
                               Hanging Gardens
                               Random Flowers
                               A variation of Random flowers
                               Leafy
                               A variation of Little Weeds
                               A new one Worm Grass 

Worn Grass Distructions


You can find all the patterns listed here on my pattern pages on this blog.


HAPPY DOODLING

Tuesday, 15 January 2013

Diva Weekly Challenge 102

Diva Weekly Challenge 102

I am the Diva's Weekly Challenge 102 was to do a design using only 2 patterns. The patterns were Auraknot and Bunzo. You can use the I am the diva button on my site to link to her challenge if you want to have a go. This is my contribution to the challenge. 

I have used black art board and gold, silver and white gel pens. The silver and white do not show up well in this photo. It was done it on A4 size paper.


I made a couple of mistakes, but it was tooo hard to correct, so it is all out there.

HAPPY DOODLING

Monday, 14 January 2013

Dare 40 + New Pattern

Zendala Dare 40

This is this weeks Dare posted on The Bright Own Blog by Erin. She was not that happy about the original outline design. I was a bit unsure. 

I was almost tempted to turn it into a Celtic Knot Pattern as it would have been an easy one to do it with, but decided I would go with the challenge of making this design interesting. 

I am still a bit unsure of whether I have achieved this. What do you think?

The patterns I used to decorate this design are all my own. The are Going Down, Galaxy, Trio and a new one Sunrise.

Sunrise


You can find the steps for my other patterns on my pattern pages.
HAPPY DOODLING

Friday, 11 January 2013

Celtic Challenge 19

Celtic Challenge 19

Hi everyone, I hope you had a wonderful Christmas and will have a happy and prosperous New Year to come.

I have had a good rest, and have some very exciting challenges for you this year. 

I will be giving you two options for each challenge this year. You can do one or both of these challenges.

I will only be posting my Challenges once a fortnight as I am my husbands carer and he is requiring more help now, so I have less time.


Challenge A, will be to copy and decorate the Celtic Knot Outline I have provided.

Challenge B, will be to use my distructions to draw your own Celtic Knot Outline and decorate it. 


Celtic Challenge 19A

Copy this outline and decorate it with patterns. You can colour and shade it also if you wish.

  Celtic Challenge 19B

Use the distructions below to draw you own Celtic Outline. You can go with the heart and teardrop shapes that I have used or come up with alternatives. Then decorate the design you have drawn however you wish.
I am discovering there are many different easy ways to draw Celtic Knots. 

This is another option.

This Celtic Four Leaf Glover was drawn, starting with a cross. You need to draw the whole thing in pencil first, as there will be some lines that will need to be erased at the end. 

Mark about a third of the way out from the centre on each arm of the cross, as you can see below.


Draw a heart shape with an extension from the point of the heart toward the point of the next heart. Do not go all the way as you need the gap for the Celtic Weave.

The point of the heart starts on the mark a third of the way from the centre and the dip in the top of the heart is on the end of the line. Draw each side of the line the same to get a perfect heart.


Draw a second line parallel to the first to form one half of the heart.

Close the gap that has been left between each heart.

Draw the other half of the heart.

This is a nice design on its own. and if you want to use this to do your challenge this week then go ahead.

I have decided to add more detail and another weave to this pattern.

Draw a teardrop shape in the centre of each heart, with an extension like the heart, toward the bottom point of the next teardrop, stopping when you get to the inside edge of the heart.

Draw another parallel line around this tear drop to complete it.

Draw the rest of the parallel lines that link each teardrop shape.

As you can see there are some pencil lines that need to be erased, so that the weave looks complete and the quide lines are gone.


Your Celtic Four Leaf Clover is now ready to be drawn in ink and decorated with doodles, shaded and coloured if you wish.

You could do this same design using other shapes at the end of the cross, for example triangles, teardrops, diamonds, stars etc. You are only limited by your imagination. The centre shape could also have limitless options, so that you can do many different designs using these distructions.

Here is my finished design.

Decorating these Celtic Designs is limited by the type of patterns that fit into these small continuous spaces. I have a page I add to constantly with new Border and Edge Doodle Patterns. Feel free to use them any time.

I have used my doodle border pattern Teardrops to decorate around this design. The centre pattern is a new one called Going Down. The distructions are below.


Shading adds a lot to a design. It takes it from the flat look to the 2 dimensional realm. I will be adding a page this week with simple shading distructions for those who want to learn.

HAPPY DOODLING